Download PDF
Download page T28934: Cooling valve 1.
T28934: Cooling valve 1

purpose
Cooling valve replacement 1 (M 3)
qualification
Qualified personnel
Material
| Pos. | Designation | article | number |
| 01 | Cooling valve 1 | T28934 | 1 |
Required material
- Torx screwdriver size 20
procedure
ATTENTION!
Working with the unit requires knowledge of the safety instructions and quick guide. That's why:
Read the safety instructions and quick guide carefully before starting any work. The basic requirement for safe work is compliance with all safety instructions and careful action by qualified qualified personnel to prevent accidents involving personal injury and property damage.
Cool down and empty the unit
- On the basic screen, tap the function button (
 ).
). - On the basic screen, tap the function button (
 ).
).
→ The unit cools down and evacuation the mold before switching it off.
switch off unit and remove covers
- Switch off the main switch (QS 1), pull out the mains-connector.
- Remove the cooling water supply (connection C).
- Remove covers from the unit (→ Open unit).
- Open the service flap on the back wall of the unit (→ Open unit).
Replacing the cooling valve
- Remove the cable from the cooling valve.
- Remove the mounting screws from the cooling valve to the cooling water module twice.
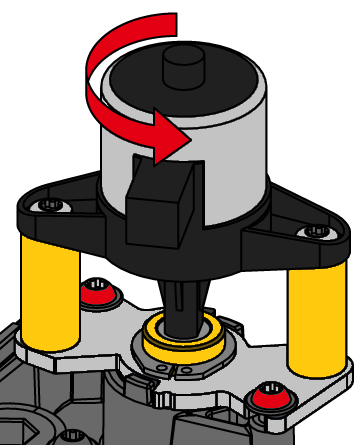
- Turn and extend the cooling valve.
ATTENTION — Improper installation!
Spare parts are delivered with valve pistons that are not fully extended. Valve plunger can brace. That's why:
- Never install the valve with the valve piston fully extended (fig.).

- Insert the new cooling valve carefully.
- Turn the cooling valve to the end position and secure with 2x Torx screws.
- Do not exceed the tightening torque — the counterpart is made of plastic (PPS)
- Connect the cable to the cooling valve.
Check tightness and function
- Connect the cooling water supply (connection C).
- Connect the mains-connector and switch on the main switch (QS 1).
NOTE!
Set the user profile to “Maintenance” to access the parameter. Click here....
- Select [Service] > [Parameter] > [Cooling] > [Stepper Motors] > [Positioning KV 1].
- Change the position and check whether the cooling water is flowing or not:
- 0% = valve completely closed
- 100% = valve completely opened
-
Switch on the unit using the I/O button (
 ), check the tightness and function of the unit.
switch off unit and install covers
-
Switch off the unit using the I/O button ().
→ The unit switches off and, if necessary, is cooled and depressurised. - Switch off the main switch (QS 1).
- Re-attach covers from the unit (→ Open unit).