Download PDF
Download page Software-update.
Software-update
NOTE!
It is recommended that you install the latest software-version as it provides bug fixes, improvements, and new Functions.
Required tools
- USB data carrier with the latest software update file.
The software update file can be downloaded directly (→ Downloads) or is provided by your country representative (www.hb-therm.com).
or
- e-cockpit app (only possible in conjunction with the Interface Server Gate-6)
The software update file is available via the e-cockpit application when connected to a Gate-6. This means that the software update file can be downloaded and installed directly via the e-cockpit app.
NOTE!
- USB data carriers formatted with FAT, FAT32, exFAT and ext2/3/4 are supported.
- The software update file must be in the main directory of the USB data carrier (top directory).
- If there are several valid software update files on the USB data carrier, the latest version is automatically installed.
- During the software update, neither the unit nor any connected units may be switched off.
software-version check
By tapping on the status field (symbol ![]() ), the information system opens. The info system displays general device information, including the currently installed software-version (SW61-1_yyww→ for example SW61-1_2319).
), the information system opens. The info system displays general device information, including the currently installed software-version (SW61-1_yyww→ for example SW61-1_2319).
Start software-update
A distinction is made as to whether an interface server Gate-6 is present in the network or not. Accordingly, the following procedures are possible.
NOTE!
- Within the network network (Gate-6, Thermo-6), it is possible to update the software from any Thermo-6 unit.
- When the update process is started, all units that are still in operation are switched off automatically first (status: ready to operate).
Starting from the Thermo-6 temperature control unit:
- close the USB drive.
→ A connected and recognized USB data carrier is displayed on the basic screen with the data carrier symbol ( ).
). - On the home basic screen tap the profile button (
 ).
). - Select [User Profile].
- Set the parameter to “extended” as a minimum.
- On the home basic screen, tap the main menu button (
 ).
). - Select [Save/Load] > [Start Software-update].
- Tap the symbol (
 ) to start the process.
→ The software is automatically installed on the affected units (Thermo-6 and Gate-6) in the same network. If necessary, the units switch off automatically beforehand (status: ready to operate) if they were still operation.
→ The ground light flashes blue on the affected units.
Starting from the Interface Server Gate-6 via the e-cockpit application:
- Open e-cockpit application (→ e-cockpit display).
- Tap on the desired interface server in the Gate-6 overview.
→ Detailed view of Gate-6 opens. - Tap the symbol (
 ).
).
→ Expanded view window opens. - Tap the symbol (
 ) to start the process.
→ The software is automatically installed on the affected units (Thermo-6 and Gate-6) in the same network. If necessary, the units switch off automatically beforehand (status: ready to operate) if they were still operation.
→ The ground light flashes blue on the affected units.
software-version not compatible on the network
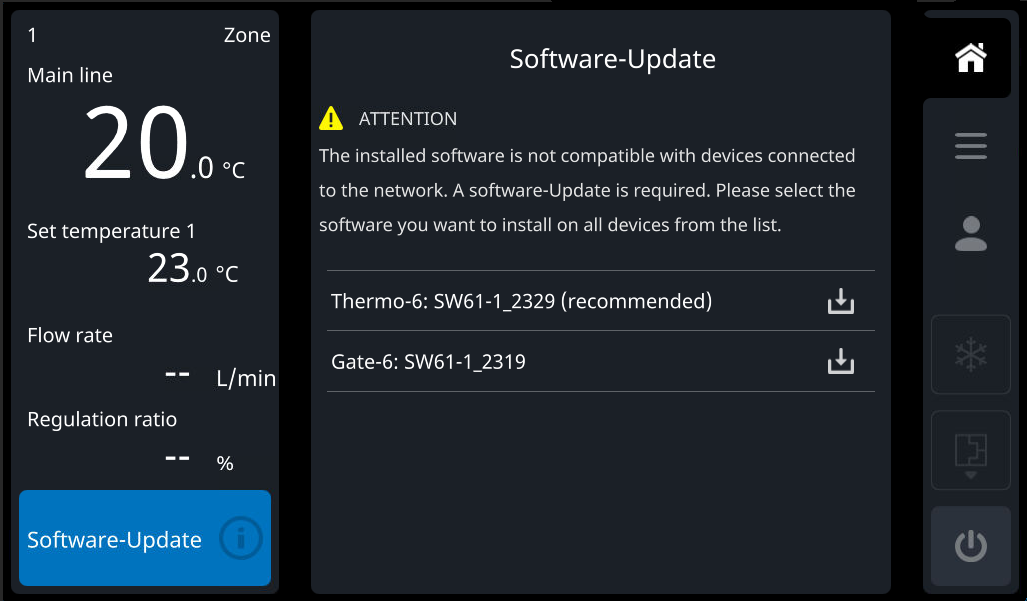

If a unit (Gate-6, Thermo-6) is detected on the network with a different software-version, it appears that the installed software is not compatible with the other connected units in the network. To ensure trouble-free communication in the network, a software-update is required to ensure that all units are running the same version.
Behavior starting with software-version SW61-1_2328:
Starting with this version, the various software versions available on the network are listed, with the latest version being shown at the top. From this list, you can select the desired software-version to be installed on all units (Fig.).
Behavior up to software-version SW61-1_2319:
Up to this version, the Interface Server Gate-6 is the master in the network. If different software versions are available on the network, the version installed on the Gate-6 is transferred to all units that do not have the same version. Note that due to the software-version of the Gate-6, a downgrade/update may have to be carried out before the entire network can be brought back to the desired software-version.
Software update process
NOTE!
While a software update is being carried out, the progress bar and the remaining time are displayed on the screen.
There is no Gate-6 on the network:
- enquiry whether the software-update should be carried out.
- The unit switches off automatically when it has been in operation. “software-update” appears in the status field.
- The data is copied from the USB data carrier to the USR-61 memory.
- The new software is loaded into the USR-61's flash memory.
- The Thermo-6 units are automatically restarted. After the restart, the new software is loaded onto the GIF-61 and ZSM-61.
- The message “Software-update successfully installed” appears on the screen.
Gate-6 available on the network:
- enquiry whether the software-update should be carried out. The Thermo-6 devices, which do not have the latest software-version, are displayed via Spotlight during the enquiry (blinking blue every 1 second).
- The data is copied from the USB data carrier to the GAT-61 memory.
- The Units switch off automatically when they are in operation. “software-update” appears in the status field.
- The new software is loaded into the GAT-61's flash memory.
- The Gate-6 restarts automatically. After the restart, the data is copied from Gate-6 to the memory of all USR-61 on the network.
- The new software is loaded into the USR-61's flash memory.
- The Thermo-6 units are automatically restarted. After the restart, the new software is loaded onto the GIF-61 and ZSM-61.
- The message “Software-update successfully installed” appears on the screen.
Help in case of problems
NOTE!
If the assistance does not solve the problem, contact your country representative.
| Problem | Remediation |
|---|---|
| Software-update cannot be started (cannot be dialed) and/or USB data carrier is not recognized. |
|
| Software-update failed |
|
| GIF or ZSM update error |
|