Download PDF
Download page T21076 replacement solenoid valve 24 VAC.
T21076 replacement solenoid valve 24 VAC

qualification
qualified personnel
Material
| Pos | description | article | number |
|---|---|---|---|
| 01 | 24 VAC complete solenoid valve | T21076 | 1 |
Required material
- Torx screwdriver size 20
- Ring spanner, size 14 and 22
- Cross screwdriver
- magnetic field tester (if available)
procedure
ATTENTION!
Working with the unit requires knowledge of the safety instructions and quick guide. That's why:
Read the safety instructions and quick guide carefully before starting any work. The basic requirement for safe work is compliance with all safety instructions and careful action by qualified qualified personnel to prevent accidents involving personal injury and property damage.
Cool down and empty the unit
- On the basic screen, tap the function button (
 ).
). - On the basic screen, tap the function button (
 ).
).
→ The unit cools down and evacuation the mold before switching it off.
Check pressure and switch off unit
- Select [Display] > [Actual Values] > [System Pressure].
→ The system pressure must display 0.0 (±0.1) bar. - The pressure shown by the pressure gauge must be 0.0 (+0.3) bar.
- Switch off the main switch (QS 1), pull out the mains-connector.
- Remove the cooling water supply (connection C).
Open service flap/remove covers
Replace solenoid valve
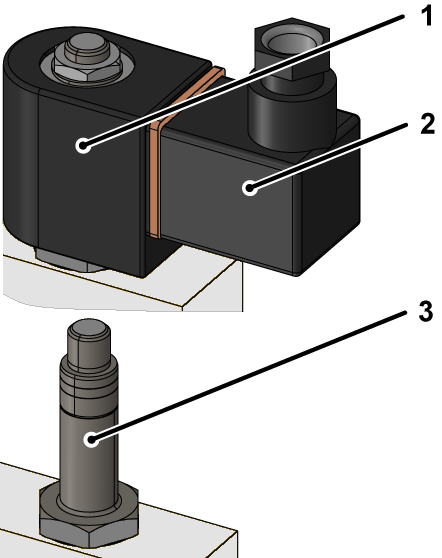
- Remove the mounting nut including the washer, which fixes the magnetic coil (1).
- Remove the solenoid coil (1) with the valve plug (2).
- Remove the valve plug (2) from the solenoid coil (1) by loosening the mounting screw and removing the plug.
- Use a ring wrench to remove and remove the valve housing (3).
NOTE!
Make sure the appropriate tightening moments are maintained for the solenoid valve to ensure safe and correct installation.
- Install a new solenoid valve and tighten it with the appropriate tightening torque, depending on the material of the housing:
- maximum 4 Nm for plastic
- maximum 15 Nm for brass
- Install the new solenoid coil on the solenoid valve and tighten with the mounting nut including the washer.
- Connect the valve plug to the solenoid coil and tighten the mounting screw.
Check tightness and function
- Connect the cooling water supply (connection C).
- Connect the mains-connector and switch on the main switch (QS 1).
-
Switch on the unit using the I/O button (
 ), check the tightness and function of the unit.
- A magnetic field tester can be used to check whether the solenoid responds and opens the valve when the valve is actuated.
switch off unit and install covers
-
Switch off the unit using the I/O button ().
→ The unit switches off and, if necessary, is cooled and depressurised. - Re-attach covers from the unit (→ Open unit).